Learning how to track ovulation at home is the single most impactful thing you can do when trying to conceive. This complete guide covers all three methods — BBT, OPKs, and cervical mucus — with practical tips to start today.
If you are trying to get pregnant, understanding when you ovulate is everything. Your fertile window — the days each cycle when pregnancy is possible — is only around six days long. Miss it, and you wait another month. Know exactly when it is, and you dramatically improve your chances every single cycle.
The good news is that learning how to track ovulation at home is simpler than most people expect. You do not need expensive equipment or specialist knowledge. You need three things: a basic understanding of your cycle, a consistent tracking method, and a little patience.
This guide covers everything you need to know to get started today — whether you are brand new to fertility tracking or have been trying for a while and want to get more precise.
Before diving in, it helps to know your estimated fertile window. Use the free calculator below to get your personalised dates based on your cycle length:
Why Tracking Ovulation Matters
Ovulation is the release of a mature egg from one of your ovaries. It happens once per cycle and the egg survives for only 12 to 24 hours. This is a remarkably short window.
However, sperm can survive in the female reproductive tract for up to five days. This means that the days leading up to ovulation are actually your most fertile — not the day of ovulation itself. Having intercourse two or three days before ovulation gives sperm time to be waiting when the egg arrives.
Without tracking, most women guess based on a textbook 28-day cycle and assume they ovulate on Day 14. The reality is that ovulation timing varies significantly from woman to woman and from cycle to cycle. Stress, illness, travel, disrupted sleep — all of these can shift ovulation earlier or later than expected.
Tracking gives you real data about your own body, not an average. And real data means better timing, less guesswork, and more confidence.
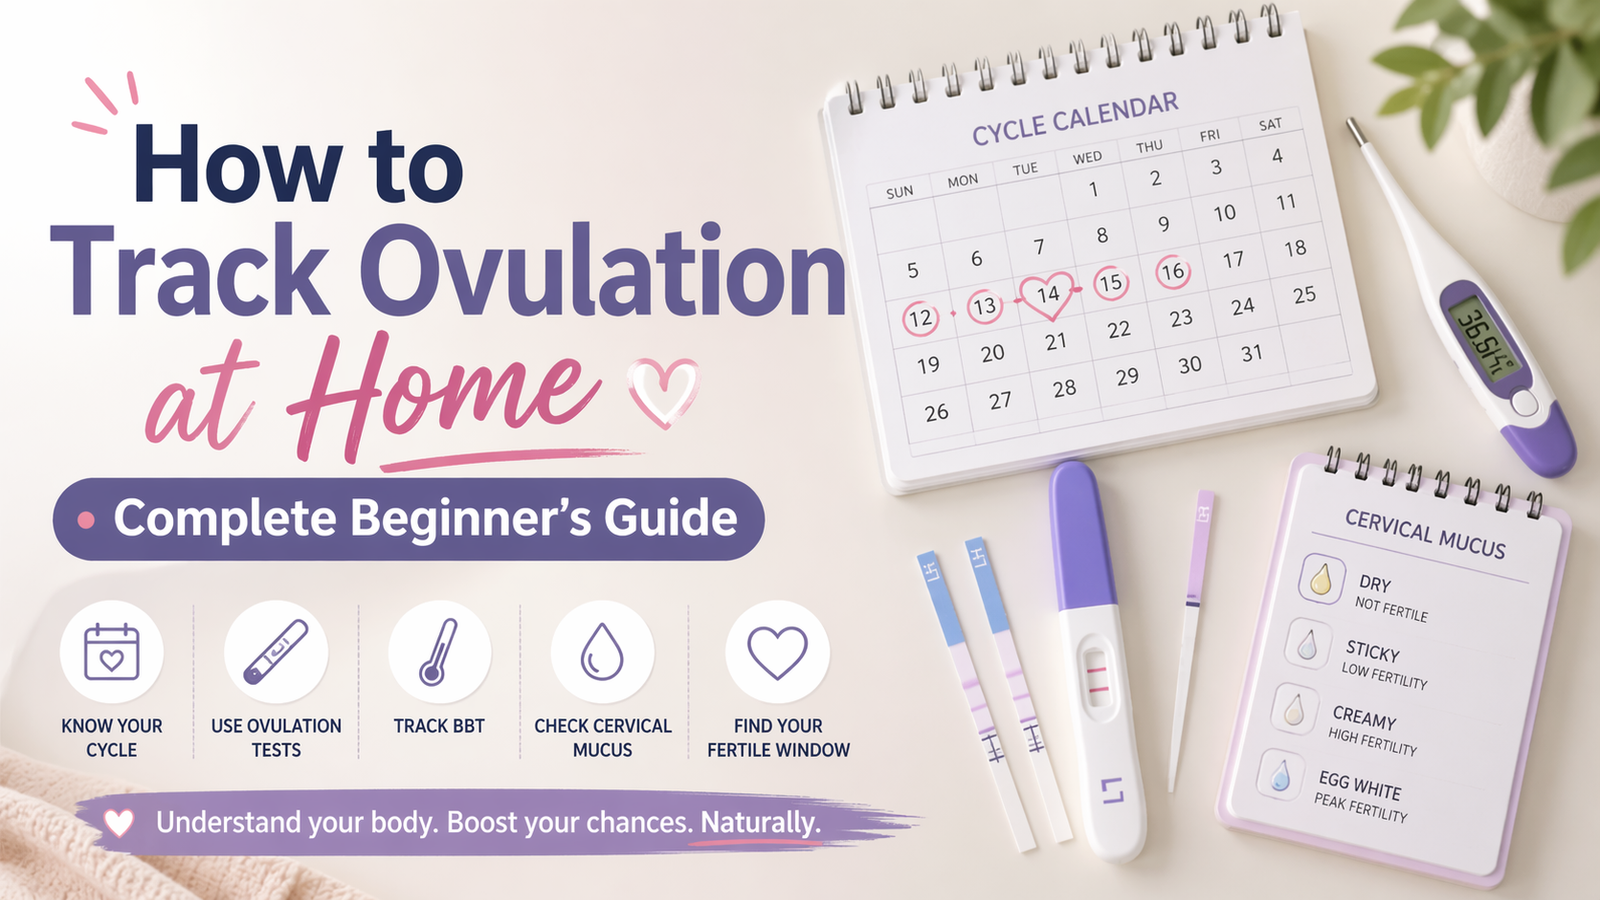
The Three Methods for Tracking Ovulation at Home
There are three well-established methods for tracking ovulation at home. Each gives you different information. Used together, they paint a complete picture of your cycle.
Method 1: Basal Body Temperature (BBT) Tracking
Basal body temperature is your resting body temperature — taken first thing in the morning before you get out of bed, speak, or even check your phone. After ovulation, the hormone progesterone causes a small but measurable rise in BBT of around 0.2 to 0.5°C (or 0.4 to 1°F). This rise persists throughout the rest of your cycle.
Charting this temperature over several months reveals a clear pattern: lower temperatures in the first half of your cycle, then a sustained rise after ovulation. Once you can spot this pattern, you can predict when your rise is likely to happen — and time intercourse accordingly.
What you need: A basal thermometer (more precise than a regular thermometer, and available online for around $10–15). A chart, app, or the free BBT Chart Tool at EasyOvulationCalculator.com.
How to do it: Take your temperature at the same time every morning — even on weekends — before getting up. Record it immediately. After two to three cycles, your pattern will become clear.
The key limitation: BBT tells you that ovulation has already happened. It is a confirmatory method, not a predictive one. By the time you see the temperature rise, your most fertile days may have already passed. This is why BBT works best alongside one of the methods below.
Method 2: Ovulation Predictor Kits (OPKs)
Ovulation predictor kits detect the luteinising hormone (LH) surge that occurs 24 to 48 hours before ovulation. A positive OPK result tells you that ovulation is approaching — giving you advance notice to act.
OPK strips are inexpensive (a pack of 50 costs around $10–15 on Amazon), easy to use, and highly reliable for most women. They are the closest thing to a real-time fertility alarm.
How to use them: Start testing from around Day 8 to 10 of your cycle (earlier for longer cycles, earlier still if your cycles are short or irregular). Test at the same time each day — mid-afternoon is generally more reliable than morning, as LH levels tend to peak in the early afternoon.
Reading the result: A positive result means the test line is as dark as or darker than the control line. Once you see a positive, ovulation is likely within 12 to 36 hours. This is the signal to begin or continue having intercourse.
Important note for women with PCOS: LH levels can be elevated throughout the cycle in polycystic ovary syndrome, which can cause false positives on standard OPKs. Advanced digital ovulation tests (such as the Clearblue Advanced) measure oestrogen alongside LH and are more reliable in this situation.
Method 3: Cervical Mucus Observation
Your cervical mucus changes in texture and appearance throughout your cycle, reflecting exactly where you are hormonally. Learning to read these changes is one of the most powerful — and completely free — fertility tracking methods available.
Here is what to look for across your cycle:
| Phase | Appearance | Fertility level |
|---|---|---|
| After period | Dry or very little | Low |
| Approaching fertile phase | White or creamy, sticky | Medium |
| Peak fertility | Clear, stretchy, slippery — like raw egg white | HIGHEST |
| After ovulation | Thick, white, less slippery | Low |
The key sign to watch for is what fertility specialists call egg white cervical mucus — abbreviated EWCM in online TTC communities. Clear, slippery, stretchy discharge that you can pull between your fingers for a centimetre or more is your most reliable real-time signal that ovulation is imminent.
How to observe it: Check your discharge on toilet paper before wiping, or notice it in your underwear throughout the day. You can also check internally if you are comfortable doing so. The pattern takes one to two cycles to get confident reading, but once you have it, it is extremely useful.
How to Use All Three Methods Together
Each method has strengths and limitations. The real power comes from combining them.
- Use OPKs to predict ovulation and know when to time intercourse
- Watch for egg white cervical mucus as your real-time peak fertility signal — when OPK is positive and mucus is egg white at the same time, you are at your most fertile
- Confirm with a BBT rise that ovulation actually occurred — and over 2–3 cycles, use your BBT chart to predict when your rise is likely to happen
After two to three cycles of tracking all three, most women have a clear picture of their personal ovulation pattern — not a textbook average, but their own individual timing. This makes every subsequent cycle easier and more confident.
5 Common Ovulation Tracking Mistakes to Avoid
Your Quick-Start Checklist — What to Do This Cycle
- ✓ Note the first day of your next period — this is Day 1 of your new cycle
- ✓ Use the free ovulation calculator to estimate your fertile window
- ✓ Buy a basal thermometer and a pack of OPK strips if you do not already have them
- ✓ Start taking your BBT every morning from Day 1
- ✓ Start testing OPKs daily from Day 8 (or earlier for shorter cycles)
- ✓ Begin observing your cervical mucus each day and noting the type
- ✓ Record everything — temperature, OPK result, mucus type, intercourse — in a simple chart or app
- ✓ Start having intercourse every 1–2 days from Day 10 of your cycle (do not wait for a positive OPK to start)
You do not need to do everything perfectly from the first cycle. Start with one or two methods, get comfortable, and add the third when you are ready. Progress matters more than perfection.
Free Tools to Support Your Tracking
All of the following tools are free to use at EasyOvulationCalculator.com:
- Ovulation Calculator — find your fertile window based on your last period and cycle length
- BBT Chart Tool — plot your daily temperatures and visualise your ovulation pattern
- Fertile Window Calculator — pinpoint your exact 5-day fertile window
- Implantation Calculator — estimate when implantation is likely after ovulation
- AI Ovulation Predictor — advanced prediction for irregular cycles
Tracking ovulation is one of those things that feels overwhelming before you start and surprisingly straightforward once you do. Most women who commit to two full cycles of consistent tracking come out the other side feeling genuinely in control of their fertility for the first time. That clarity — knowing your body, knowing your window, knowing your pattern — is worth every day of effort.